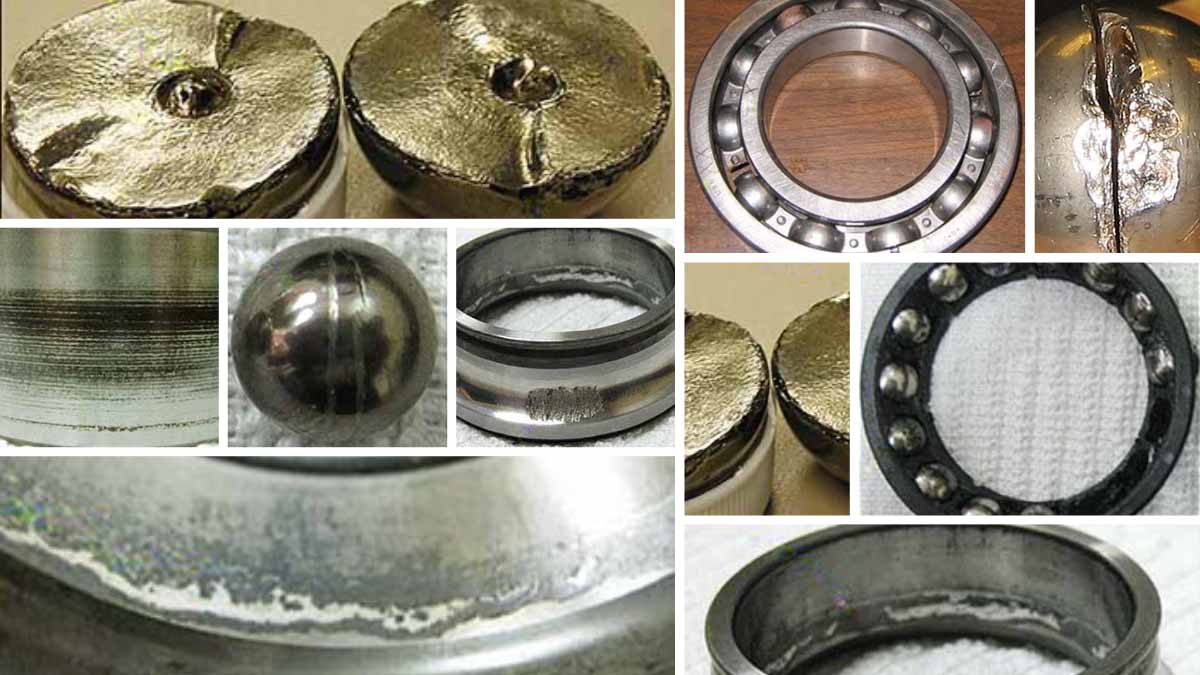
This will be metallurgy 101 for seasoned analysts but intended for those on the front lines. You are the ones who will determine if the analysts get these rolling element bearing failed parts or not for a detailed root cause analysis. How the parts are preserved is extremely important to the investigators.
I will try to provide you with enough education to make it challenging and fun, not only to preserve the failed parts properly but also to participate with your curiosity about the influences that adversely impact the failed parts.

Some of the basics in evidence preservation after a failure include the following:
Secure the failure scene. Rope off (caution tape) the scene and ensure it is safe for investigators to enter.
Take many pictures from many angles. This will preserve the scene in its ‘as-is’ state. Remember, at this point, you may not know what is relevant to the failure itself, so ensure you take pictures of the entire failure scene. As you collect and analyze the facts, things in your initial pictures will make more sense.
Clear close-ups of failed areas. Take high-resolution pictures of the failure scene, especially the failed surfaces of broken components. These pictures will likely be blown up to look for more granularity. Such pictures will include the following (in this article) but are certainly not limited to them:
- Sight glasses – ensure you take pictures at the angles in which someone would be viewing the sight glass (sometimes sight glasses can be easily misread due to parallax error [the angle at which they are viewed])
- Piping – note if the failures occur at ‘T’s,’ ‘U’s,’ or straight runs. If cracks, are they parallel or perpendicular to the pipe run? Is the failure at a weld?
- Valve positions – note valve positions as on, off, or partially open
- Structure – base etc. – Note any anomalies in structures that could contribute to the failure (i.e., resonance, soft foot, etc.)
- Couplings – note all anomalies on the coupling (just like we will describe here for roller bearings)
- Guards – note the condition and location of guards (even if they exist at all).
Take pictures up and down stream of failure. Initially, we may not know if there were upstream and/or downstream influences that contributed to the failure. Therefore, we must preserve those scenes as well.
Take video of failure event area. Chances are you will be time-pressured by production to hurry up and get what you need and then get out, as they will want to get production rolling again. The fastest way to preserve the scene is with video!
Map out the event scene as needed. Once you have your pictures and videos, draw a map or sketch of the failure scene and note where the anomalies are located. This will be a team job to aid in the investigation.
Interview key people who were present as the event unfolded. It is crucial to interview witnesses immediately. The longer you wait to interview, the more attention to detail you will lose (due to short-term memory loss). You will also lose direct observation information if the witness is influenced by talking to others involved (say, in the break room), and their opinions are reshaped as a result.
Map out where each person was during the event. Just like we talked about mapping out physical anomalies at the failure scene, we should also note where key players were as the failure unfolded (as opposed to where they should have been).
Create a timeline. An accurate and detailed timeline of events leading to the failure is always critical to the investigation.
Instruct area leadership about what parts you want and where to stage them. You may not be able to get certain parts you need because they are still in operation. If this happens, you will need to get the cooperation of area leadership to ensure you get the parts when they are available (perhaps a shutdown). This will require planning where you want them to stage the desired parts.
In the following clips, you will notice some redundancy in the guidance for each clip. This is because it is anticipated that if this article is printed off, each clip will stand independent of the others.
Since this article focuses only on rolling element bearings, we will break down the components of a roller bearing and provide essential guidance on preserving, documenting, and examining the evidence.
Primary State of Failure
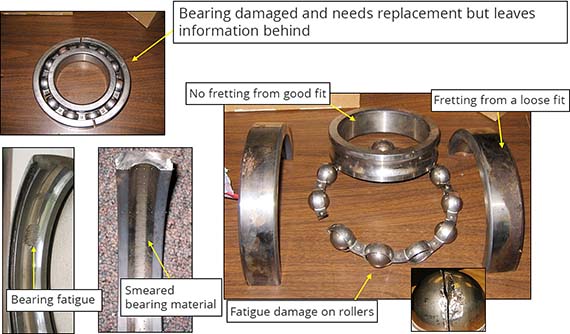
Let’s start with the failed roller bearing when it is still intact, at least when it is still in one piece.
Failed Roller Bearing
ACTIONS
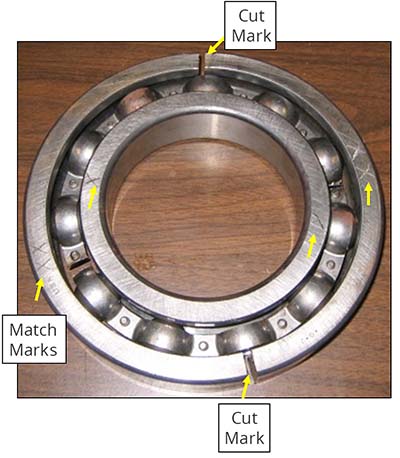
- Examine outer ring, inner ring bore, cage, and rollers before splitting the bearing.
- Document all markings on the bearing.
- Photograph the bearing from all angles before splitting.
- Determine the area with the least damage and cut through the outer ring.
- Leave the inner ring and cage intact whenever possible.
- Note that the X’s or ‘match marks’ are used to determine bearing orientation.
Once we have the bearing properly split, we will lay the components on a clean surface so we can document and photograph the bearing internals further.
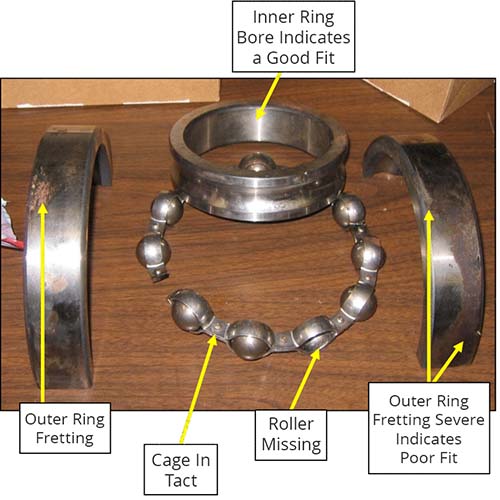
Components laid out on a clean surface.
ACTIONS
- Split the bearing.
- Document all anomalies visually observed.
- Photograph all bearing anomalies.
- Use the X’s or ‘match marks’ for bearing orientation while examining.
When examining the rollers, we need to take high-resolution pictures and note the anomalies, as expressed in the example below.
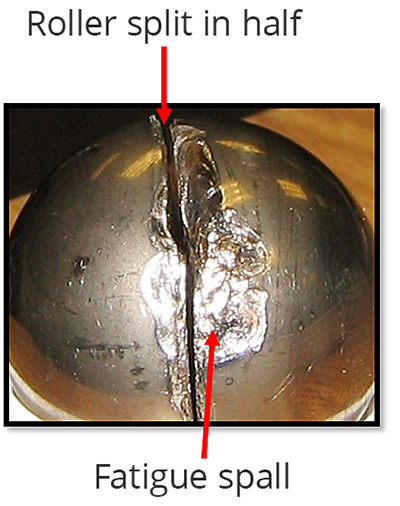
Rollers
ACTIONS
- Examine rollers.
- Document all anomalies visually observed.
- Photograph all anomalies.
- Use the X’s or ‘match marks’ for bearing orientation while examining.
Based on the above picture, after being split, we then expose the failure patterns of the failed surface (as we described in the previous article on recognizing erosion, corrosion, fatigue, and overload)
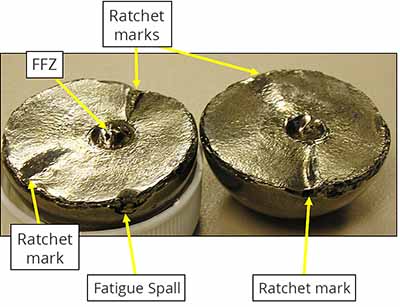
ACTIONS
- Examine rollers.
- Document all anomalies.
- Photograph all anomalies.
Turning to examining the outer ring, the same as described before. Take hi-res pics and note anomalies that need to be explained.
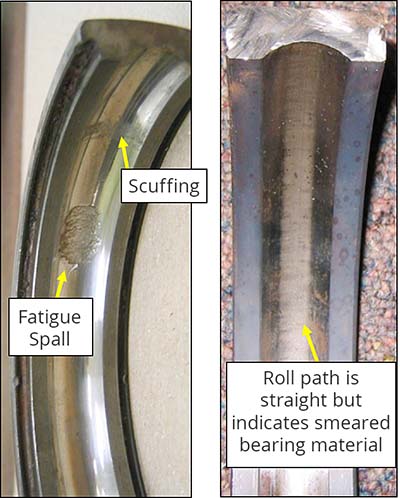
Outer Ring
ACTIONS
- Examine outer ring roller path
- Document all anomalies visually observed.
- Photograph all anomalies.
- Use the X’s or ‘match marks’ for bearing orientation while examining.
Now, let’s look at sealed roller bearings, which will essentially follow the same paths from the standpoint of failure preservation, documentation, and examination.
Sealed Roller Bearing Inspection
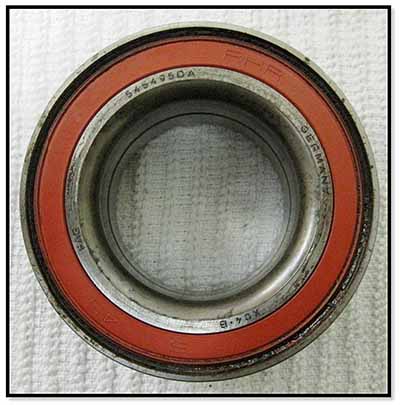
We will examine the outer ring on the sealed roller bearing, take high-res pics, and note anomalies, as shown in the example below.
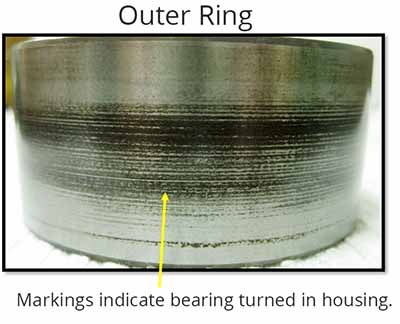
Sealed Roller Bearing Inspection – Outer Ring
ACTIONS
- Examine outer ring, inner ring bore, cage, and rollers before splitting the bearing.
- Document all markings on the bearing.
- Photograph the bearing from all angles before splitting.
Looking at the inner ring bore, the routine is the same. The example below shows evidence of fretting, indicating a problem with proper fit.
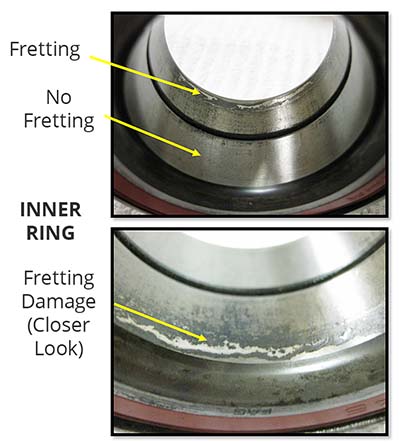
Sealed Roller Bearing Inspection – Inner Ring Bore. Fretting
ACTIONS
- Examine the outer ring, inner ring bore, cage, and rollers before splitting the bearing.
- Document all markings on the bearing.
- Photograph the bearing from all angles before splitting.
- Determine the area with the least damage and cut through the outer ring.
- Leave the inner ring and cage intact whenever possible.
Continuing on with looking at the inner ring bore, we note anomalies on the inside and the outside of the ring. In this case we have fretting on the inside and spalling on the outside of the ring.
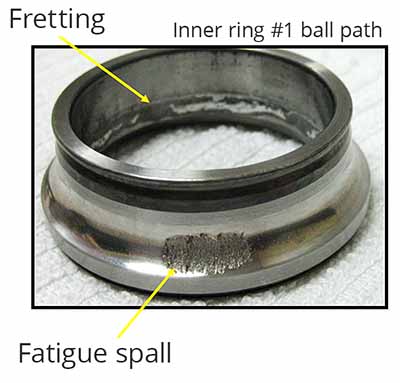
Sealed Roller Bearing Inspection – Inner Ring Bore. Fretting and Spalling.
ACTIONS
- Split bearing.
- Examine outer ring, inner ring bore, cage, and rollers.
- Document all markings on the bearing.
- Photograph the bearing from all angles before splitting.
- Take a lubrication sample for testing if applicable.
- Examine outer ring and inner ring bore.
This is just another example of the examination and notation of anomalies. The inner ring looks fine, indicating proper fit, but scuffing on the ball path indicates secondary damage that needs to be explained.
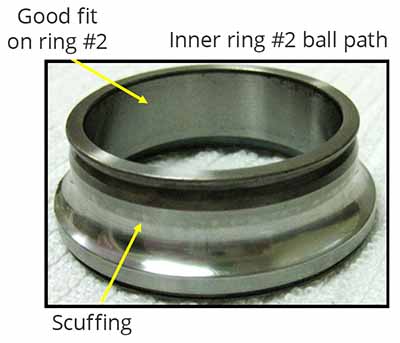
Sealed Roller Bearing Inspection – Inner Ring Bore. There are early signs of secondary damage on the ball path.
ACTIONS
- Split bearing.
- Examine outer ring, inner ring bore, cage, and rollers.
- Document all markings on the bearing.
- Photograph the bearing from all angles before splitting.
- Take a lubrication sample for testing if applicable.
Let’s move on to the roller-bearing cage—the same routine for examination regarding pics and notations. Here, we show pictures of both sides and note a lubrication-related anomaly that has to be explained (How Could? per our Root Cause Analysis approach discussed in prior articles).
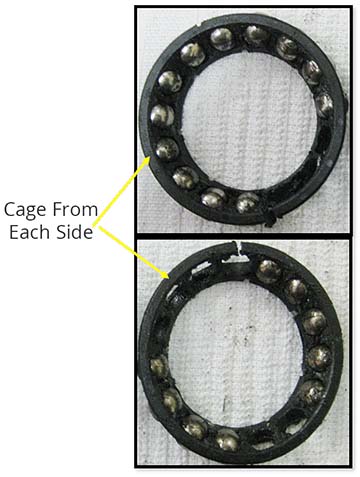
Sealed Roller Bearing Inspection – Cage. Little Cage Damage Visible. Lubrication Dry from Heat.
ACTIONS
- Split bearing.
- Examine outer ring, inner ring bore, cage, and rollers.
- Document all markings on the bearing.
- Photograph the bearing from all angles before splitting.
- Take a lubrication sample for testing if applicable.
We move on to the rollers, taking pics from various sides. In the examples below, we note the anomaly that the rollers were not moving freely, and there is evidence of excessive heat. All of these conditions must be explained as to how they came to be (cause-and-effect) via an effective RCA.
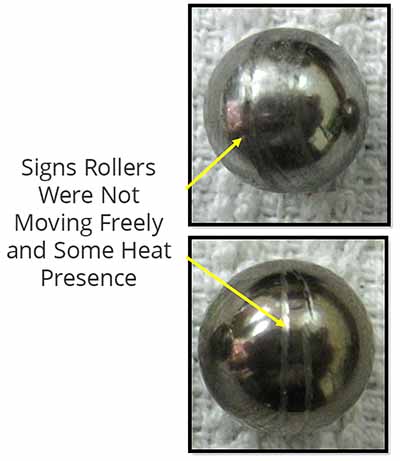
Sealed Roller Bearing Inspection – Rollers. Evidence of Excessive Heat.
ACTIONS
- Split bearing.
- Examine outer ring, inner ring bore, cage, and rollers.
- Document all markings on the bearing.
- Photograph the bearing from all angles before splitting.
As always, I appreciate all of the great feedback and the sharing from the veterans in the field who are on the front lines and make things happen!

