
Chain drives are a crucial component of a conveyor system. They transmit needed power from the drive unit to a portion of the conveyor system. This article covers:
- Various types of chains are used to transmit power in a conveyor system.
- The advantages and disadvantages of using chain drives.
- The correct installation procedure for chain drives.
- How to maintain chain drives.
- How to calculate speeds and ratios that will enable you to make corrections or adjustments to conveyor speeds.
- How to determine chain length and sprocket sizes when adjusting speed.
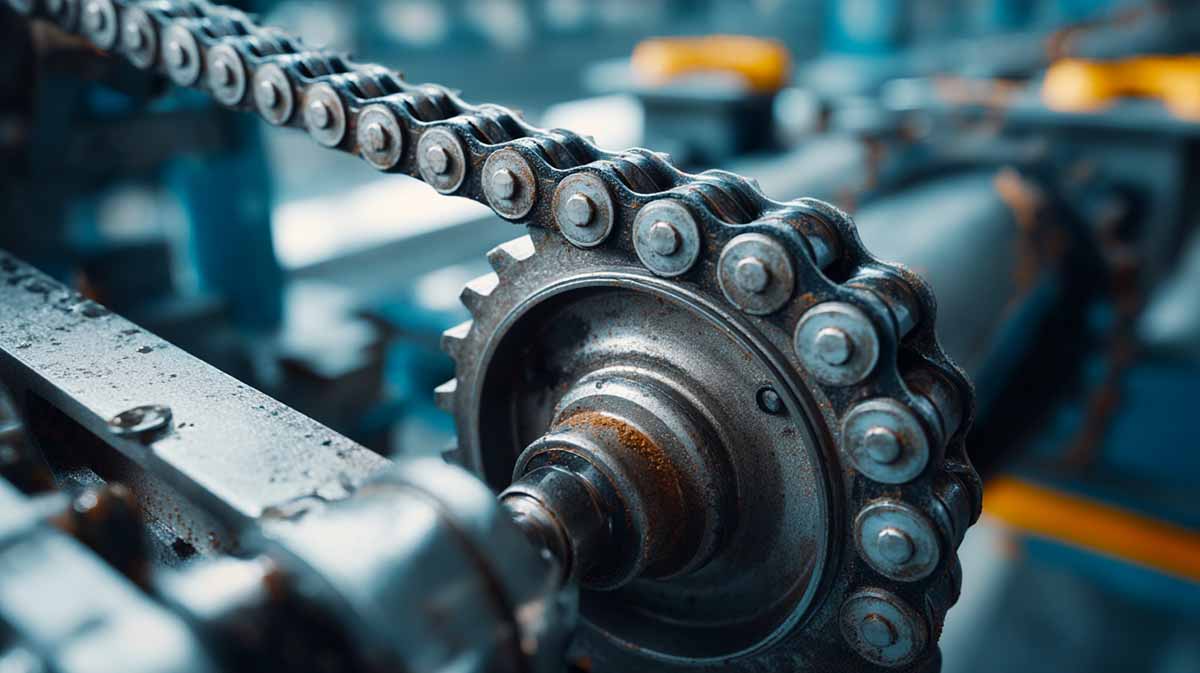
Chain drives transmit power between a drive unit and a driven unit. For example, if we have a gearbox and a contact roll on a conveyor, we need a way to transmit the power from the gearbox to the roll. A chain drive unit can easily and efficiently do this.
Chain drives can consist of one or multiple-strand chains, depending on the load that the unit must transmit. The chains need to be matched with the sprocket type, and they must be tight enough to prevent slippage.
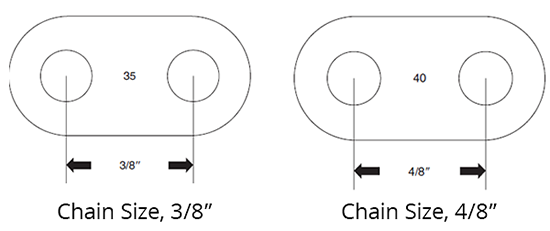
The chain is sized by the pitch or the center-to-center distance between the pins. This is done in 1/8 “increments, and the pitch number is indicated on the sidebars. Examples of the various chain and sprocket sizes are shown below.
Chain Selection – Plain or Detachable-Link Chain
Plain chains are typically used in low-speed applications, such as conveyors. They are rugged, designed to carry heavy loads, and, when properly maintained, can offer years of reliable service.
They comprise a series of detachable links that do not have rollers.
The problem is that if the direction of the chain is reversed, the chain can come apart. When replacing a motor, the rotation of the coupling must be the same before you connect the coupling to the driven unit.
Roller Chain
Roller chains are composed of roller links joined by pin links. The links consist of two sidebars, two rollers, and two bushings. The roller reduces friction between the chain and the sprocket, thereby increasing the unit’s lifespan. Roller chains can operate at faster speeds than plain chains, and properly maintained, they will offer years of reliable service.
Some roller chains come with a double pitch, meaning that the pitch is double that of a standard chain, but the width and roller size remain the same. Double-pitch chains can be used on standard sprockets, but double-pitch sprockets are also available.
The primary advantage of the double-pitch chain is that it is more cost-effective than the standard pitch chain. Therefore, they are often used in applications that require slow speeds, such as lifting equipment in a hot press operation.
Sprockets
Sprockets are fabricated from various materials depending on the drive’s application. Large, fabricated steel sprockets are manufactured with holes to reduce the sprocket’s weight on the equipment. Because roller chain drives often have restricted spaces for installation or mounting, the hubs are available in several different styles, as shown in the figure below.
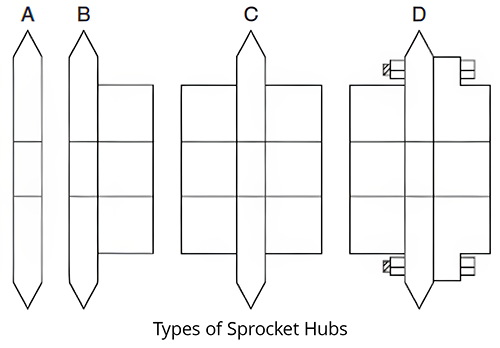
Type A sprockets are flat and do not have a hub. They are usually mounted on the flanges or hubs of the device they are driving. This is accomplished through a series of holes that are either plain or tapered.
Type B sprocket hubs are flush on one side and extend slightly on the other side. The hub is extended to one side to allow the sprocket to be fitted close to the machinery it is being mounted on. This eliminates a large overhang load on the equipment’s bearings.
Type C sprockets are extended on both sides of the plate surface. They are usually used on the driven sprocket, where the pitch diameter is larger, and on hub classification, where there is more weight to support the shaft.
Remember this: The larger the load is, the larger the hub should be.
Type D sprockets use an A sprocket mounted on a solid or split hub. The type A sprocket is split and bolted to the hub. This is done for ease of removal and not for practicality. It allows the speed ratio to be easily changed by simply unbolting the sprocket and replacing it without removing bearings or other components.
Chain Installation
When the proper procedures are followed for installing chains, they will yield years of trouble-free service.
Use the following procedure to perform this task:
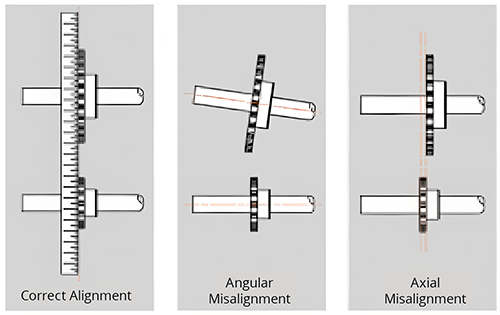
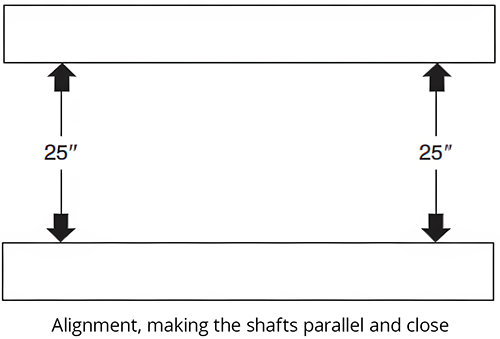
- The shafts must be parallel, or the chain’s life will be shortened. The first step is to level the shafts. This is accomplished by placing a level on each shaft and adjusting the shimming on the low side until the shaft is level, as seen in the figure below.
- The next step is to ensure the shafts are parallel. This is done by measuring at different points
They are usually used on the driven sprocket, where the pitch diameter is larger, and on the hub classification, where there is more weight to support the shaft. Remember this: The larger the load, the larger the hub should be.
When the proper procedures are followed for installing chains, they will yield years of trouble-free service.
Use the following procedure to perform this task:
- The shafts must be parallel, or the chain’s life will be shortened. The first step is to level the shafts. This is accomplished by placing a level on each shaft and adjusting the shimming on the low side until the shaft is level.
- The next step is to ensure that the shafts are parallel. This is achieved by measuring different points on the shaft and adjusting them until they are spaced equally apart. Before performing this procedure, ensure that the shafts are pulled in as closely as possible. The jacking bolts can evenly separate the shafts after the chain is installed.
- Before installing a set of used sprockets, verify their size and condition.
- Install the sprockets on the shafts following the manufacturer’s recommendations. Locate and install the first sprocket. Then, use a straightedge or a string to align the other one with the one that has already been installed.
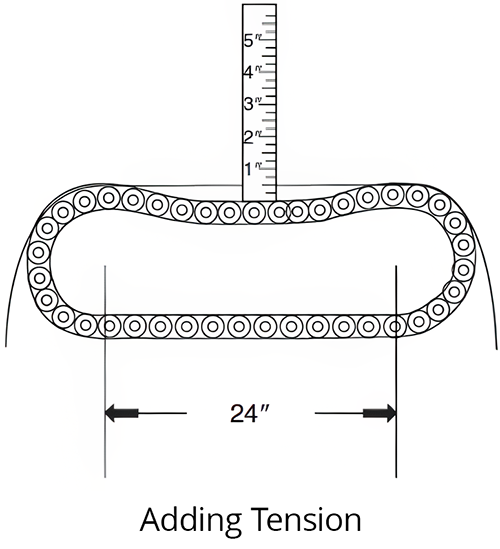
- Install the chain on the sprockets, then begin increasing the distance between them by turning the jacking bolts until the chain is snug but not too tight. To set the proper chain sag, deflect the chain ¼” – ′′ per foot of span between the shafts. Use a string or straightedge and place it across the top of the chain. Then, push down on the chain just enough to remove the slack. Use a tape measure to measure the amount of sag as shown below.
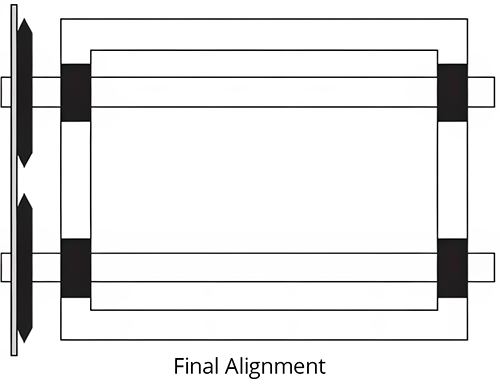
- Do a final check for parallel alignment. Remember: The closer the alignment, the longer the chain will run as shown in the figure below.
Preventive Maintenance Procedures for Chain Drives
Inspection (risk of failures for not following the procedures below is noted along with a rating):
LOW: minimal risk/low chance of failure
MEDIUM: Failure is possible, but equipment not operating to specification is highly probable;
HIGH: Failure will happen prematurely.
Inspect a chain for wear by inspecting the links for worn bushings. If worn bushings are noted, write a corrective maintenance work order so that the replacement can be planned and scheduled later.
The risk of not following the procedure is high. Chain breakage will occur.
Lubricate the chain with lightweight oil recommended by the chain manufacturer. (Ask your chain supplier to visit your site and make recommendations based on documentation they can present to you.) The Risk if the procedure is not followed is high. Chain breakage will occur.
- Check chain sag. Measure the chain sag using a straight edge or a string, and verify the specifications noted in this PM (Preventive Maintenance) task.
- Set tension and note at the bottom of the PM work order if a deficiency is noted. The risk of not following the procedure is medium. Sprocket and chain wear will accelerate, thus causing equipment stoppage.
- Inspect the sprockets for worn teeth and abnormal wear on the sides. (The question is: Can the sprockets and chain last for two more weeks without equipment stoppage?) If possible, write a corrective maintenance work order for this job to be planned and scheduled with the correct parts.
- If the sprocket does not last two weeks, then change all the sprockets and the chain. Set and check the sheave and chain alignment and tension.
- Warning: When changing a sprocket, all sprockets and the chain should be changed because the difference between a worn and new sprocket in pitch diameter can be extreme, thus causing premature failure of the sprockets and chain. The risk of not following the procedure is high. Worn sprockets indicate that the equipment is in a failure mode. Action must be taken.